Getting Started with Bicep
 Stephen Tulp
December 4, 2023
8 minutes to read

Introduction
In this blog post, we will install Bicep, VS Code extensions and other tooling that help to get started with Bicep. We will also look at some of the best practices that we should follow when developing Bicep templates. Finally, we will look at some useful links to help us on our journey.
Bicep Setup
This article will go through the steps to install the Bicep tooling and required extensions that are needed to get started. No need to reinvent the wheel here.
VSCode Extensions
The following is also a list of VSCode extensions that I find useful when developing Bicep templates.
- CodeTour extension for Visual Studio Code Allows recording and playback walkthrough of code
- ARM Tools extension for Visual Studio Code Helpful for converting ARM templates to Bicep
- ARM Template Viewer extension for Visual Studio Code Helpful for converting ARM templates to Bicep
- PSRule extension for Visual Studio Code More on this later in the month
- EditorConfig for VS Code Manage your editor settings in VSCode
- GitHub Co-Pilot for VS Code More on this later in the month
- GitHub Co-Pilot Chat for VS Code More on this later in the month
Git
Git helps you manage your code projects and enables the creation of different versions of your files, called commits, and switch between them easily. It also allows you to collaborate with other developers by sharing your code on online platforms, such as GitHub.
Next we ned to install Git
GitHub Repo
Across the month we are going to build on the various concepts and techniques to build out an Azure Landing Zone, to do this we need a GitHub repo to store the templates and code.
- Fork the Insight Bicep Advent Calendar that we will be using across the month.
- In your forked repository, clone the repo into VSCode. Introduction to Git in VS Code provides some basic steps on how to do this.
A summary of the repo structure is below.
| Files and Folders | Description |
|---|---|
.github |
Workflows and associated scripts for GitHub action yaml files. |
.psrule |
Any custom rules and examples for PSRule. |
docs |
Any markdown files, documentation and wiki files. |
src |
Root folder for configuration, modules, orchestration, scripts. |
src/configuration |
Bicep Parameter files and shared .json and .yaml parameters. |
src/modules |
CARML and custom Bicep modules that are consumed by the main bicep file. |
src/orchestration |
The main.bicep template that will then orchestrate deployment of the relevant modules and resources. |
src/scripts |
PowerShell script to do the deployment locally. |
ps-rules.yaml |
PS-Rule configuration file. (More on this later in the month) |
README.md |
Main README in the root of the repo |
Bicep Best Practices
Now that we have installed the tooling and extensions, let’s take a look at some of the best practices that we should follow when developing Bicep templates. Some of these best practices might not be clear straight away, but as you progress through your authoring journey it will make your templates more readable and maintainable.
Parameters
- Use good naming for parameter declarations. Good names make your templates easy to read and understand. Make sure you’re using clear, descriptive names, and be consistent in your naming.
- Use the
@alloweddecorator sparingly as you might block valid deployments. As Azure services add SKUs and sizes, your allowed list will need to be updated. - Use descriptions for parameters. Try to make the descriptions helpful, and provide any important information about what the template needs the parameter values to be.
- Parameter declarations can exist anywhere in the template file, although it’s usually a good idea to put them at the top of the file so your Bicep code is easy to read.
- Use minimum and maximum character length for parameters that control naming as this will help avoid errors later during deployment.
Variables
- Unlike parameters, when using variables the data type are required
- Bicep functions can be used to create a variables, this is helpful when you need to create a variable that is a combination of other variables or parameters.
- Once a variable is defined in the template, you reference the value using the variable’s name.
- Use variables for hardcoded values that don’t change between deployments, and use parameters for values that change between deployments.
Names
- Use lower camel case for names, such as
variableNameormyResource. - The uniqueString() function is useful for creating unique resource names. When you provide the same parameters, it returns the same string every time.
- It’s a good practice to use template expressions to create resource names, like in this example:

- Strings generated by
uniqueString()aren’t meaningful. It’s helpful to use a template expression to create a name that includes meaningful information. - The
uniqueString()function doesn’t guarantee globally unique names. By adding additional text to your resource names, you reduce the likelihood of reusing an existing resource name. Useful for things like Azure storage accounts that are globally unique. - Sometimes the
uniqueString()function creates strings that start with a number. Some Azure resources, like storage accounts, don’t allow their names to start with numbers. Adding a prefix to this helps control the naming more. - Many Azure resource types have rules about the allowed characters and length of their names. Embedding the creation of resource names in the template means that anyone who uses the template doesn’t have to remember to follow these rules themselves.
Resource definitions
- Don’t embed complex expressions directly into resource properties, this clutters resource definitions with logic. Use variables for these expressions instead as this approach makes your code easier to read and understand.
- Use the latest API version for each resource where possible, this ensures that you have access to the latest features and fixes.
- Use implicit dependencies over explicit dependencies, the
dependsOnresource property enables you to declare an explicit dependency between resources, it’s usually possible to use the other resource’s properties by using its symbolic name. This approach creates an implicit dependency between the two resources, and enables Bicep to manage the relationship itself. - Use the
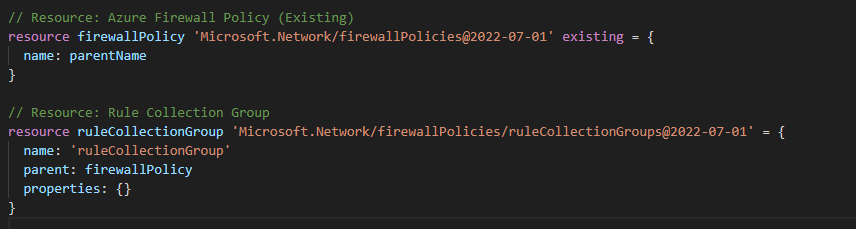
existingkeyword when a resource isn’t deployed in the Bicep file, this allows you to use the symbolic reference for the resource.
Outputs
- Don’t create outputs for sensitive data, these can be accessed via the deployment history.
Conclusion
So now we understand a little about Bicep and the benefits it brings, we have installed the required tooling and extensions and have a good understanding of some of the best practices that we should follow when developing Bicep templates. Finally, we have some useful links to help us on our journey. Tomorrow we will look into the various elements and structure of a Bicep template.
Further Reading
Some further reading on the topics covered in this post:
- Microsoft Learn - Getting started with Bicep Great self paced way to learn
- Awesome Azure Bicep list A great community initiative around a one stop place to learn all things Bicep
- Bicep Playground Great way to convert existing ARM templates to Bicep