Building iOS pipelines in Github Actions with Fastlane
Author:
James Morgan
Published: August 30, 2024
15 minutes to read
Background
Recently I was on a project that required us to migrate iOS App Azure Devops (ADO) Pipelines to GitHub Actions. Easy right, shouldn’t take more than a day? ADO offers all the tasks required to build, test and deploy your iOS app to the App Store. GitHub probably offers the same tasks, if not, at the very least there will be community packages, right…. right?!
I was very quickly humbled by the fact that there are no official actions, and the community actions were mediocre at best, using deprecated tools, and not maintained. Most of my research kept leading me down the route of having to build out the actions yourself calling the appropriate CLI commands, or using a tool called Fastlane, which I brushed off at the time as just another complicated tool that I didn’t have time to deal with. I was focused on getting the pipeline up and running as quickly as possible, so I opted to cobble together a solution using the available community actions and some custom scripting.
Don’t Reinvent the wheel
At first, I thought all hope was lost, and started building my own reusable actions, and after painstakingly build all of them out, I thought there had to be a better way, this can’t be the best way forward.
After some digging through the existing pipelines, community actions and unmaintained repos, I kept stumbling into a called Fastlane. I quickly realised this is the tool I’ve been looking for the whole time!
Fastlane lets you build a workflow declaratively in a fastlane file, which can then be executed locally, or on any CI/CD pipelines. In these files you write lanes which represent a sequence of actions to take, and fastlane handles the rest for you. Fastlane isn’t limited to iOS, it can also be used for Android, React Native, Flutter and even NativeScript.
Lanes are written using Ruby as the language of choice, however there is a beta version of Fastlane that allows you to write your configuration in Swift. I would highly recommend checking it out if you are fan of the Swift language. I would not recommend using fastlane Swift for production just yet though as it is still in beta and the api may change over time!
Building your first lanes
This isn’t a step-by-step tutorial, so I would recommend reading the Fastlane Getting Started documentation for how to set up Fastlane locally.
To show how easy it is to use fastlane, we are going to build out 2 lanes, one for running unit tests for your iOS application, and the other will be a full continuous deployment lane, which will build and deploy to Test Flight.
Unit Test Lane
Want to build a simple lane to run your unit tests for you? You’ve come to the right place!
Tests Before Fastlane
Previously if you wanted to run a unit test, you would have to run the xcodebuild command. While it’s a very complex
command, it’s not very declarative, and if the xcodebuild api changes, you will need to update your action.
You may notice xcbeautify is piped onto the end of the output, this is because the output from xcodebuild is not
very pretty. Previously there was a tool called xcpretty however that is now deprecated in favour of xcbeautify.
When building a reusable action do you really want to focus on what tool makes the output actually readable? Probably
not, luckily fastlane will handle this for us.
xcodebuild -scheme "TestScheme" \
        -workspace "./MyCoolProject.xcodeproj/project.xcworkspace" \
        -sdk iphoneos \
        -configuration Debug \
        -destination 'platform=iOS Simulator,name=iPhone 15 Pro,OS=17.5' \
        clean build test -resultBundlePath ./TestResults.xcresult | xcbeautify --renderer github-actions
Tests After Fastlane
The declarative lane below should help illustrate just how powerful fastlane is. While a lot of the inputs are very
similar, the action itself is a lot more declarative, and we don’t need to pipe our output to an external prettier
either! Fastlane will default to xcbeautify but if it can’t find it, then it will resort to xcpretty.
The key part here is the run_tests action inside the lane, which will execute the unit testing and provide a lovely
output for you on how your unit testing went.
default_platform(:ios)

platform :ios do
  desc "Run tests"
  lane :run_tests_only do

    run_tests(
      workspace: "./MyCoolProject.xcodeproj/project.xcworkspace",
      scheme: "TestScheme",
      devices: ["iPhone 15 Pro"],
      clean: true,
      output_directory: "./TestResults",
      result_bundle: true
    )

  end
end
The lane can be executed via the following command bundle exec fastlane run_tests_only
Build & Deploy Lane
At this stage you might be wondering if fastlane is actually worth it? After all the Unit test lane didn’t really have anything complex going on.
This is where the iOS pipeline gets a bit complex, as building and deploying an app requires a few tedious steps:
- Import the p12 certificate into keychain
- Install the app provisioning profile into Xcode
- Update the bundle and build version
- Build and archive the application
- Export the app to an
ipafile - Upload to testflight
If any of these stages were erroneous, the whole deployment would fail.
Deployment Before Fastlane
Many of the steps involved here were quite tedious, take for example installing the app provisioning profiles. You had 2 valid options here.
- Use the Apple App Store Connect API to download the appropriate provisioning profiles
- Store the provision profile as Base64 in your GitHub environment secrets and write to disk when needed
Both steps were fairly involved, had their own quirks to worry about, and required building custom scripts, which meant yet another bit of code to maintain.
Another very messy step was updating the bundle and build version. Prior to Xcode 14, these versions were only stored in
the Info.plist file, which meant you could write a bash script that calls PlistBuddy to modify the CFBundleVersion
and CFBundleShortVersionString.
Newer versions of Xcode, now also store these versions internally in the project.pbxproj file, which is not as easy to
modify, and not something you want to try to write custom scripts for.
Deployment After Fastlane
Thankfully Fastlane has actions for each of these steps! Below is a lane that will import a p12 certificate, download the latest provisioning profiles, increment the build number, build the app, and then deploy to Test Flight.
Note:
If deploying via GitHub Actions, I would recommend removing the import_certificate action from fastlane and handling
that yourself, due to GitHub Actions not supporting secure files. I will cover this in the next section.
default_platform(:ios)

platform :ios do
  desc "Build and deploy the app to the App Store"
  lane :build_and_deploy do |options|

    # Import p12 certificate
    import_certificate(
      certificate_path: options[:p12_cert_path],
      certificate_password: options[:p12_cert_pswd]
    )

    # Create API key
    api_key = app_store_connect_api_key(
      key_id: options[:apple_key_id],
      issuer_id: options[:apple_issuer_id],
      key_content: options[:apple_api_key],
      is_key_content_base64: true,
      in_house: false
    )

    # Download provisioning profiles
    get_provisioning_profile(
      api_key: api_key,
      app_identifier: options[:bundle_id]
    )

    # Increment build number
    increment_build_number(
      build_number: options[:build_number],
      xcodeproj: "./MyCoolProject.xcodeproj"
    )

    # Build the app
    build_app(
      workspace: "./MyCoolProject.xcodeproj/project.xcworkspace",
      scheme: options[:xcode_scheme],
      clean: true,
      silent: true,
      export_method: "app-store",
      export_options: {
        provisioningProfiles: {
          options[:bundle_id] => "match AppStore #{options[:bundle_id]}"
        }
      }
    )

    # Deploy to App Store
    upload_to_testflight(
      api_key: api_key,
      skip_submission: true,
      skip_waiting_for_build_processing: true,
      app_identifier: options[:bundle_id],
      team_id: options[:app_store_team_id]
    )
  end
end
The lane can be executed via the following command
bundle exec fastlane build_and_deploy \
  p12_cert_path:"$" \
  p12_cert_pswd:"$" \
  xcode_scheme:"$" \
  build_number:"$" \
  bundle_id:"$" \
  apple_key_id:"$" \
  apple_issuer_id:"$" \
  apple_api_key:"$" \
  app_store_team_id:"$"
Integrating into GitHub Actions
Now that we have a working fastlane file, how do we go about actually executing them on GitHub? Below are some sample workflows that could be used for both testing and deploying. Note, if running in the same worker, the actions for installing can be only called once. Creating a re-usable setup action would be the recommendation.
In the previous section I mentioned:
I would recommend removing the
import_certificateaction from fastlane and handling that yourself, due to GitHub Actions not supporting secure file.
What do I mean by this? Well GitHub Actions don’t support importing any type of Secure File, instead the recommendation is that you convert secure files to a Base64 string and store them as secrets instead.
This means you would have convert the Base64 string back to raw bytes then save to a file, then reference that file in Fastlane. While this is a totally valid approach, and isn’t very complex at all, an easier approach is to just use the apple-actions/import-codesign-certs Community Action.
Test Workflow
This workflow is intended to run the unit tests of your iOS application. Usually you would integrate this as a step required to merge a PR.
This test workflow does a few things for setup.
- Setup Ruby + Fastlane
- Setup Xcode
- Install Apple Certificates
- Execute
run_tests_onlylane
Steps 1-3 can easily be abstracted away into their own setup action.
Test Sample Workflow
jobs:
  test:
    name: Test iOS App
    runs-on: macos-latest
    steps:
      - name: Checkout repository
        uses: actions/checkout@v3

      - name: Set up Ruby
        uses: ruby/setup-ruby@v1
        with:
          ruby-version: 3.3

      - name: Install Bundler
        run: gem install bundler

      - name: Install Fastlane
        run: bundle install

      - name: Setup XCode
        uses: maxim-lobanov/setup-xcode@v1
        with:
          xcode-version: latest-stable

      - name: Install Apple certificates
        uses: apple-actions/import-codesign-certs@v3
        with:
          keychain-password: $
          p12-file-base64: $
          p12-password: $

      - name: Run Fastlane Tests Only
        run: bundle exec fastlane run_tests_only
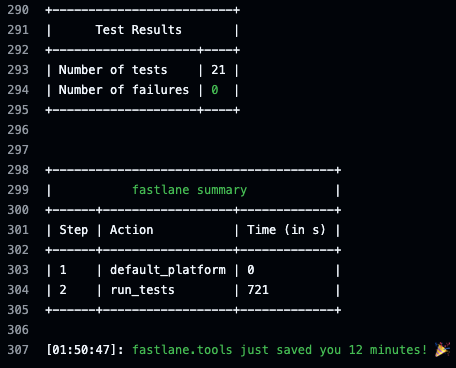
Test Results
Below is a sample output from the GitHub action.
Deployment Workflow
This workflow is intended to build and deploy your iOS application to TestFlight. Usually you would integrate this as a step that occurs when you merge into main.
The deployment workflow is very similar to the Test Workflow
- Setup Ruby + Fastlane
- Setup Xcode
- Install Apple Certificates
- Execute
build_and_deploylane with all the required inputs
Similarly, steps 1-3 can easily be abstracted away into their own setup action.
This workflow can then be used to deploy development, test and production applications, simply by changing the GitHub Environment.
Deployment Sample Workflow
jobs:
  deploy:
    runs-on: macos-latest
    environment: $
    steps:
      - name: Checkout repository
        uses: actions/checkout@v3

      - name: Set up Ruby
        uses: ruby/setup-ruby@v1
        with:
          ruby-version: 3.3

      - name: Install Bundler
        run: gem install bundler

      - name: Install Fastlane
        run: bundle install

      - name: Setup XCode
        uses: maxim-lobanov/setup-xcode@v1
        with:
          xcode-version: latest-stable

      - name: Install Apple certificates
        uses: apple-actions/import-codesign-certs@v3
        with:
          keychain-password: $
          p12-file-base64: $
          p12-password: $

      - name: Run Fastlane Build & Deploy
        run: |
          bundle exec fastlane build_and_deploy \
          xcode_scheme:"$" \
          build_number:"$" \
          bundle_id:"$" \
          apple_key_id:"$" \
          apple_issuer_id:"$" \
          apple_api_key:"$" \
          app_store_team_id:"$"
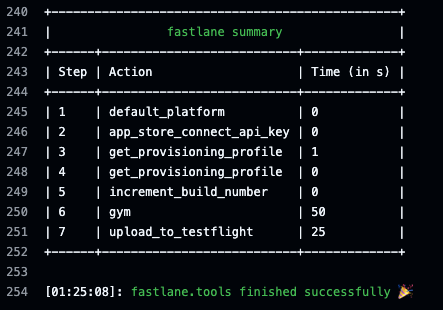
Deployment Results
Below is a sample output from the GitHub action.
Closing Out
With Fastlane, we can define our build processes declaratively, eliminating the need to write custom scripts for each step. This not only reduces the amount of code we need to maintain but also minimizes the risk of introducing bugs — something app developers are always keen to avoid, given the limited time and resources.
This only covers the tip of the iceberg of what fastlane offers, and I would highly recommend you check out their docs on more advanced tooling and techniques that they offer.
For example Match lets you store all your certificates and profiles in a centralised git repo that each team member can access. This is awesome for local development, as it will automatically renew, repair and update broken or expired credentials.