Capturing and Deploying Azure VMs with Azure Compute Gallery
Author:
Md Kowser Hossain
Published: January 7, 2025
12 minutes to read

Introduction
In today’s tech landscape, cloning or capturing an image of a VM is not very common. This technique is typically employed to transfer a production VM to a development environment for testing or to separate business units for data cleansing. Cloning virtual machines is essential for effective data cleaning during business separations, which frequently arise during mergers, divestitures, or reorganisations. Understanding how to capture an image is, therefore, crucial. This technical blog will provide a step-by-step guide on capturing and cloning enterprise VMs for redeployment.
Why Cloning and redeploying are essential for SMO (Separation Management Office):
-
Isolation: Cloning allows each business unit to operate in its own environment. This isolation helps prevent conflicts between applications, data, and configurations.
-
Resource Management: Different business units often have varying resource needs. Cloning VMs ensures that each unit can be allocated the necessary CPU, memory, and storage without impacting others.
-
Security: Segregating VMs can enhance security. If one unit is compromised, the others remain protected, reducing the risk of a widespread security breach.
-
Customization: Cloned VMs can be tailored to meet the specific requirements of each business unit, allowing for different configurations, software versions, and policies.
-
Testing and Development: Cloning enables separate environments for testing and development, which helps avoid disruptions in the production environment and allows for experimentation without risk.
-
Compliance and Auditing: For organisations in regulated industries, having separate VMs can simplify compliance with legal and regulatory requirements, as each unit can maintain its own audit trails and data handling practices.
-
Disaster Recovery: Cloning facilitates easier backup and recovery strategies for individual business units, ensuring that critical data and applications are protected.
-
Cost Efficiency: By using a shared infrastructure while maintaining separate environments, organisations can optimise costs and improve resource utilisation.
Overall, cloning VMs is a strategic approach to maintain operational efficiency, security, and compliance while allowing for flexibility in managing diverse business unit needs.
Capturing and Deploying Azure VMs
One of the best ways to capture and deploy Azure VMs is to use the Azure Compute gallery. Azure Compute Gallery is an effective tool for managing and deploying virtual machine (VM) images in Azure. It allows you to create, store, and version images efficiently, ensuring consistent deployments across your infrastructure. In this blog post, we’ll walk through the process of capturing a VM image to Azure Compute Gallery and then deploying new VMs from that gallery.
Why Use Azure Compute Gallery?
Using the Azure Image Gallery, there are some benefits you will get :
-
Centralized Management: Organize and manage multiple images in one place.
-
Versioning: Keep track of different versions of your images for easy updates and rollbacks.
-
Scaling: Quickly deploy instances from a single source, simplifying scaling operations.
Prerequisites
Before you start, ensure that you have:
-
Run the below PowerShell Command to determine the next secure password reset.
Note:- Make sure not to clone the VM on the same date and time when the domain password will resetGet-ADComputer -Identity $computerName -Properties PasswordLastSet
-
The Azure CLI is installed or has access to the Azure Portal.
-
Disable Accelerated networking on Clone VM.
Note:- Currently, Microsoft not supported for capturing the Image has Accelerated networking is enabled
Step 1: Create an Azure Compute Gallery
1. Navigate to the Azure Portal:
- Log in to your Azure account.
2. Create the Compute Gallery:
-
Click on Create a resource and search for Azure Compute Gallery.
-
Fill in the required details, such as Subscription, Resource Group, Gallery Name, and Location.
-
Click Review + Create, then Create
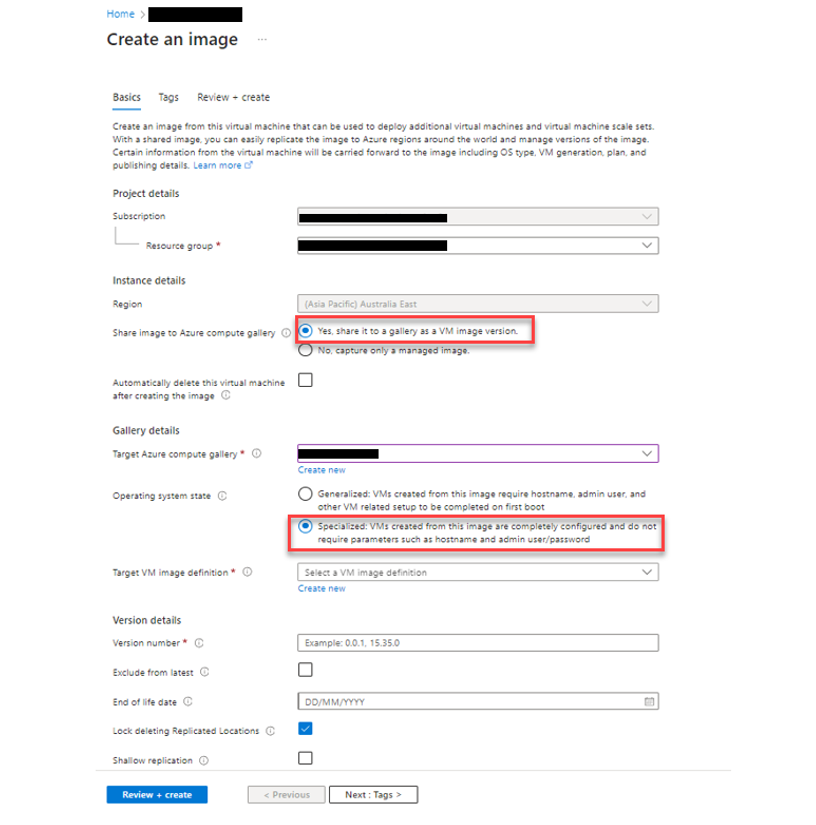
Step 2: Capture the VM Image with Operating System State – Specialized
Capturing a VM with a “specialized” setting is useful when you want to quickly replicate a VM with its exact configuration, including user accounts, applications, and specific settings, essentially creating a snapshot of the VM at a particular point in time, allowing you to quickly deploy new VMs with the same setup without having to reconfigure each one manually; this is particularly valuable for development, testing, or migration scenarios where you need identical environments with specific data and configurations.
Option A: Using the Azure Portal
1. Select Your VM:
- Go to the Virtual Machines section and choose the VM you want to capture.
2. Capture the Image:
-
Click on Capture in the top menu.
-
In the capture blade, select the Resource Group and Region for this Image
-
In the Gallery Details, Select the Azure Compute Gallery created earlier,
-
In the Operating System State, Select Specialized
-
In the Target VM Image definition section, select Create New and fill out the VM Image definition details
-
In the capture blade, Click Review + Create to create an image.
Option B (Optional): Using Azure CLI
You can also use the Azure CLI to capture the image and add it to the image gallery.
1. Open your command-line interface and log in:
az login
2. Capture the image and add it to your gallery:
    az image create --resource-group <ResourceGroupName> --name <ImageName> --source <VMName> --gallery <GalleryName> --gallery-image-definition <ImageDefinitionName>
    Replace <ResourceGroupName>, <ImageName>, <VMName>, <GalleryName>, and <ImageDefinitionName> with your specific values.
Note:- The Azure CLI doesn’t have a direct “specialize” command because specialization happens automatically when you use the VM in a “running” state (as opposed to the “generalized” state used when preparing the VM for capture). So, using the Azure portal for this specific scenario is a better option.
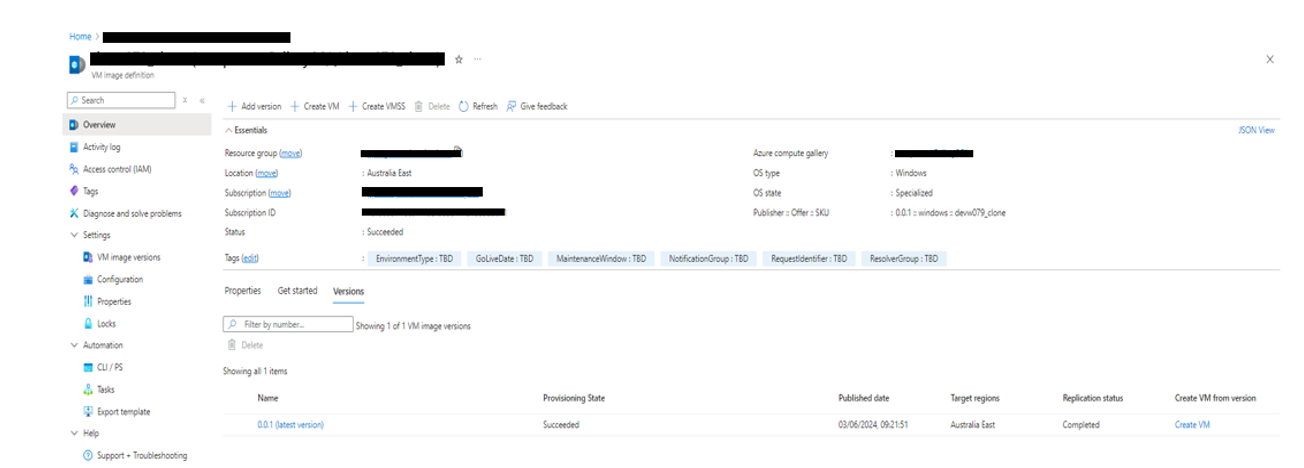
Step 3: Deploy a VM from the Image Gallery
Once you have captured the image in the gallery, you can deploy new VMs from it.
Note:- While creating the new image, ensure the original VM is shut down to avoid conflicting with the AD VM name.
Option A: Using the Azure Portal
1. Navigate to Create a Resource:
- Go to Create a resource > Virtual Machine.
2. Select the Image:
-
In the Image section, select Browse all public and private images.
-
Choose your Image Gallery and then select the image definition you captured.
3. Create VM:
-
In the VM Image definition blade, Select Create VM and fill in the required details such as VM Name, Size, Admin Username, and Password.
-
Click Review + Create, then Create to deploy the VM.
Option B (Optional): Using Azure CLI
To deploy a new VM from your image gallery using the CLI, run the following command:
    az vm create --resource-group <ResourceGroupName> --name <NewVMName> --gallery-image <GalleryName>/<ImageDefinitionName> --gallery-image-version <ImageVersion>
    Replace <ResourceGroupName>, <NewVMName>, <GalleryName>, <ImageDefinitionName>, and <ImageVersion> with your specific values.
Step 4: Log into the Specialized VM
Log into the specialised VM with a local username and password and Sysprep the VM
Why do we need to Sysprep ?
Sysprep, or System Preparation, is necessary to “generalize” a Windows installation by removing unique computer-specific information like security identifiers (SIDs) and computer names, allowing you to clone and deploy that image onto multiple different computers without conflicts, essentially making it a standardized, reusable template for new machines.
Sysprep the VM
1. Open a command prompt as an admin:
-
Run the below command to Sysprep the VM
%WINDIR%\system32\sysprep\sysprep.exe /generalize /shutdown /oobe
Note:- Make sure VM is Shutdown after the sysprep
Step 5: Capture the Final VM Image with Operating System State – Generalized
Option A: Using the Azure Portal
1. Select Your VM:
- Go to the Virtual Machines section and choose the Sysprep VM you want to capture the final image.
2. Capture the Image:
-
Click on Capture in the top menu.
-
In the capture blade, select the Resource Group and Region for this Image
-
In the Gallery Details, Select the Azure Compute Gallery created earlier,
-
In the Operating System State, Select Generalized
-
In the Target VM Image definition section, select Create New and fill out the VM Image definition details
-
In the capture blade, Click Review + Create to create an image.

Option B (Optional): Using Azure CLI
You can also use the Azure CLI to capture the image and add it to the image gallery.
1. Open your command-line interface and log in:
az login
2. Deallocate the VM:
az vm deallocate --resource-group <your-resource-group> --name <your-vm-name>
3. Genetalize the VM:
az vm generalize --resource-group <your-resource-group> --name <your-vm-name>
4 Capture the image and add it to your gallery:
    az image create --resource-group <ResourceGroupName> --name <ImageName> --source <VMName> --gallery <GalleryName> --gallery-image-definition <ImageDefinitionName>
    Replace <ResourceGroupName>, <ImageName>, <VMName>, <GalleryName>, and <ImageDefinitionName> with your specific values.
Step 6: Deploy a Final VM from the Image Gallery
Once you have captured the image in the gallery, you can deploy new VMs from it. As this image is generalised, we can deploy as many VMs as we need from this Image.
Option A: Using the Azure Portal
1. Navigate to Create a Resource:
- Go to Create a resource > Virtual Machine.
2. Select the Image:
-
In the Image section, select Browse all public and private images.
-
Choose your Image Gallery and then select the image definition you captured.
3. Create VM:
- In the VM Image definition blade, Select Create VM and fill in the required details such as VM Name, Size, Admin Username, Subnet Details and Password.
Note: This time, we need to provide the proper VM name as per the company naming standard. This VM will be used as a clone VM of the original VM in future.

- Click Review + Create, then Create to deploy the VM.
Option B (Optional): Using Azure CLI
To deploy a new VM from your image gallery using the CLI, run the following command:
    az vm create --resource-group $myResourceGroup --name $vmName --gallery-image <GalleryName>/<ImageDefinitionName> --gallery-image-version <ImageVersion>
    Replace <ResourceGroupName>, <NewVMName>, <GalleryName>, <ImageDefinitionName>, and <ImageVersion> with your specific values --admin-username $adminUsername --admin-password $adminPassword
Step 7: Add the VM to the domain
Log into the VM with the local user name and password and add the VM to the domain.
Conclusion
Capturing an image from an Azure VM and deploying it via Azure Image Gallery streamlines the process of managing and scaling your virtual environments. With centralised image management and version control, you can efficiently handle updates and ensure consistency across deployments.
Feel free to reach out with any questions or share your experiences using Azure Image Gallery! Happy cloud computing!